OpenFOAMを使って二次元翼型解析を行う
解析に使ったファイルはGithubにアップしてある
≫mtkbirdman.com/OpenFOAM/2D_airfoil/
はじめに
今回は,次の論文に使われたOpenFOAMのファイルをもとに二次元翼型の解析を行った
≫[1810.08217] Deep Learning Methods for Reynolds-Averaged Navier-Stokes Simulations of Airfoil Flows
≫thunil_Deep-Flow-Prediction_ A framework for fluid flow (Reynolds-averaged Navier Stokes) predictions with deep learning
もともとはOpenFOAM v5で使われていたファイルだが,v2006でも動かすことができた
ディレクトリの構成は次のようになっている
2D_airfoil
│  .python-version
│  Allrun.py
│
├─airfoil
│  │  airfoil.foam
│  │  airfoil.geo
│  │  airfoil.msh
│  │  airfoil_template.geo
│  │  Allclean
│  │  Allrun
│  │  foam.log
│  │  U_template
│  │
│  ├─0
│  │      nut
│  │      nuTilda
│  │      p
│  │      U
│  │
│  ├─constant
│  │  │  transportProperties
│  │  │  turbulenceProperties
│  │  │
│  │  └─polyMesh
│  │      │  boundary
│  │      │  cellZones
│  │      │  faces
│  │      │  faceZones
│  │      │  neighbour
│  │      │  owner
│  │      │  points
│  │      │  pointZones
│  │      │
│  │      └─sets
│  │              internal
│  │
│  ├─postProcessing
│  │  └─residuals
│  │      └─0
│  │              solverInfo.dat
│  │              solverInfo_0.dat
│  │
│  └─system
│          controlDict
│          fvSchemes
│          fvSolution
│          internalCloud
│          residuals
│
└─airfoil_database
        NACA4412.dat
OpenFOAMに必要なファイルは/airfoilに入っている
解析したい翼型のdatファイルを/airfoil_databaseに入れ,/2D_airfoilでAllrun.pyを実行すればメッシュを切ってsimpleFoamを実行してくれる
モデル作成
解析に使用する翼型のdatファイルを用意する
今回はNACA4412の解析を行う
datファイルはXFLR5で出力したものを利用する
メッシュ作成
メッシュの作成はgmshで行う
これのインストールがまあ大変だったので,別記事で詳しく解説する
≫【OpenFOAM v2006】gmshのインストール
airfoil.geoファイル
参考サイト
≫自作ソルバにGmshを! - Qiita
それでは実際に,Allrun.pyで作成されるairfoil.geoの中身を見てみる
Point(1000) = { 1.0, -0.0, 0.00000000, 0.005};
Point(1001) = { 0.999758, 6.8e-05, 0.00000000, 0.005};
Point(1002) = { 0.999032, 0.000274, 0.00000000, 0.005};
 :
(中略)
 :
Point(1199) = { 0.999749, -3e-06, 0.00000000, 0.005};

Spline(1000) = {1000:1199,1000};

edge_lc = 0.2;
Point(1900) = { 5, 5, 0, edge_lc};
Point(1901) = { 5, -5, 0, edge_lc};
Point(1902) = { -5, -5, 0, edge_lc};
Point(1903) = { -5, 5, 0, edge_lc};

Line(1) = {1900,1901};
Line(2) = {1901,1902};
Line(3) = {1902,1903};
Line(4) = {1903,1900};

Line Loop (1) = {1,2,3,4};
Line Loop (2) = {1000};
Plane Surface(1) = {1,2};

Extrude {0, 0, 1} {
  Surface{1};
  Layers{1};
  Recombine;
}

Physical Surface("back") = {1027};
Physical Surface("front") = {1};
Physical Surface("top") = {1022};
Physical Surface("exit") = {1010};
Physical Surface("bottom") = {1014};
Physical Surface("inlet") = {1018};
Physical Surface("aerofoil") = {1026};
Physical Volume("internal") = {1};
それぞれのコマンドが何を意味しているのかを,1つずつ順番に見ていく
理解を深めるために,Gmshのサイトからgmsh-4.6.0-Windows64をダウンロードしてGUIアプリケーションの方でも見てみることにする
≫PENGUINITIS - Gmsh の使い方
まず最初のPointコマンドによって翼型のデータが入力される
≫Gmsh reference manual (stable release) - 5.1.1 Points
Point(1000) = { 1.0, -0.0, 0.00000000, 0.005};
Point(1001) = { 0.999758, 6.8e-05, 0.00000000, 0.005};
Point(1002) = { 0.999032, 0.000274, 0.00000000, 0.005};
 :
(中略)
 :
Point(1199) = { 0.999749, -3e-06, 0.00000000, 0.005};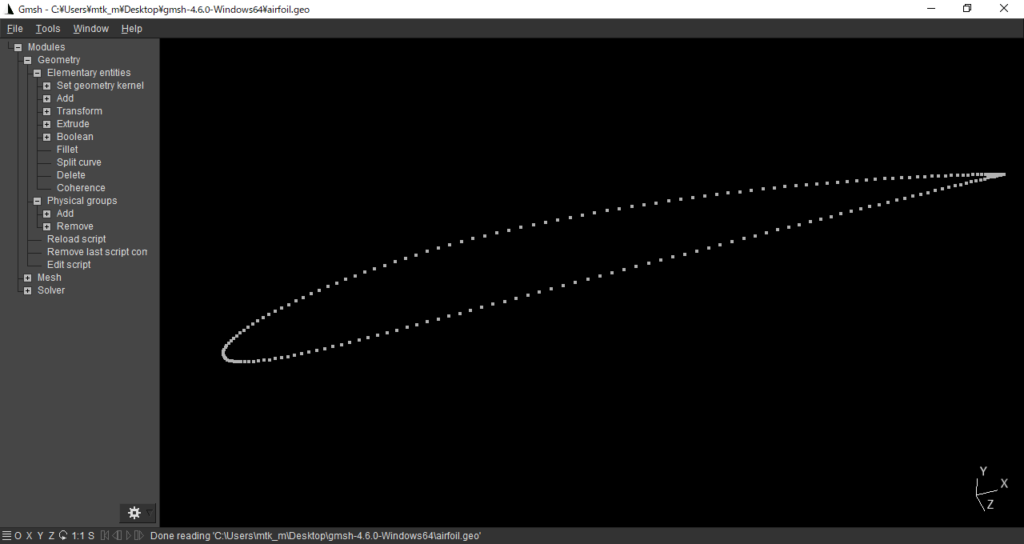
Splineコマンドによって点群をつないで閉曲線を作る
≫Gmsh reference manual (stable release) - 5.1.2 Curves
Spline(1000) = {1000:1199,1000};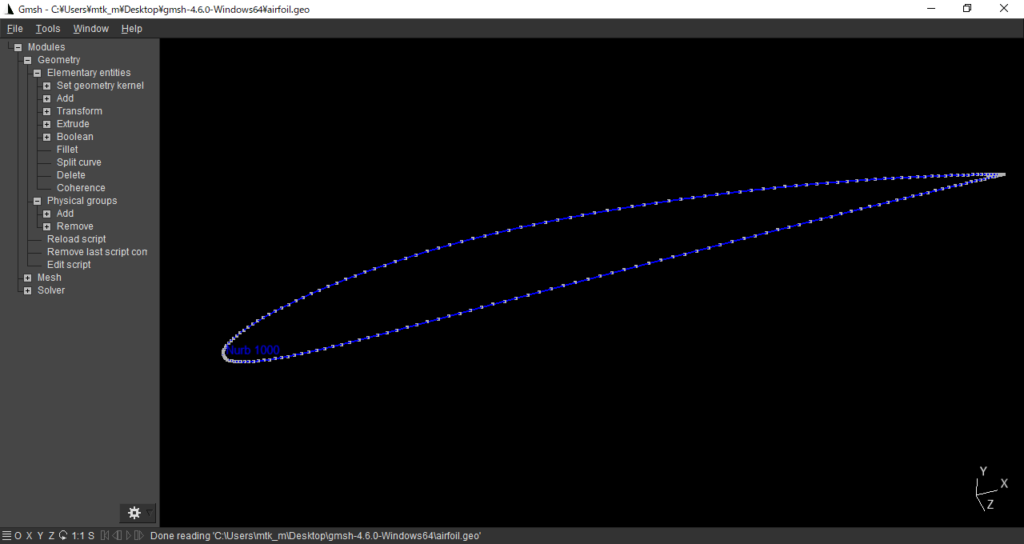
再びPointコマンドを使って,解析領域の外側の点を打つ
edge_lc = 0.2;
Point(1900) = { 5, 5, 0, edge_lc};
Point(1901) = { 5, -5, 0, edge_lc};
Point(1902) = { -5, -5, 0, edge_lc};
Point(1903) = { -5, 5, 0, edge_lc};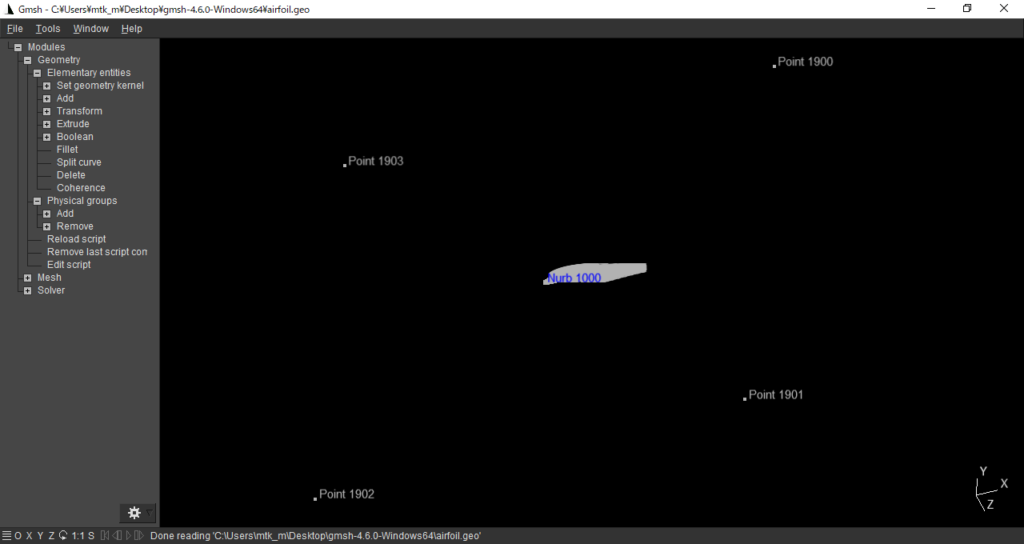
Lineコマンドを使って,4つの辺となる直線を作る
Line(1) = {1900,1901};
Line(2) = {1901,1902};
Line(3) = {1902,1903};
Line(4) = {1903,1900};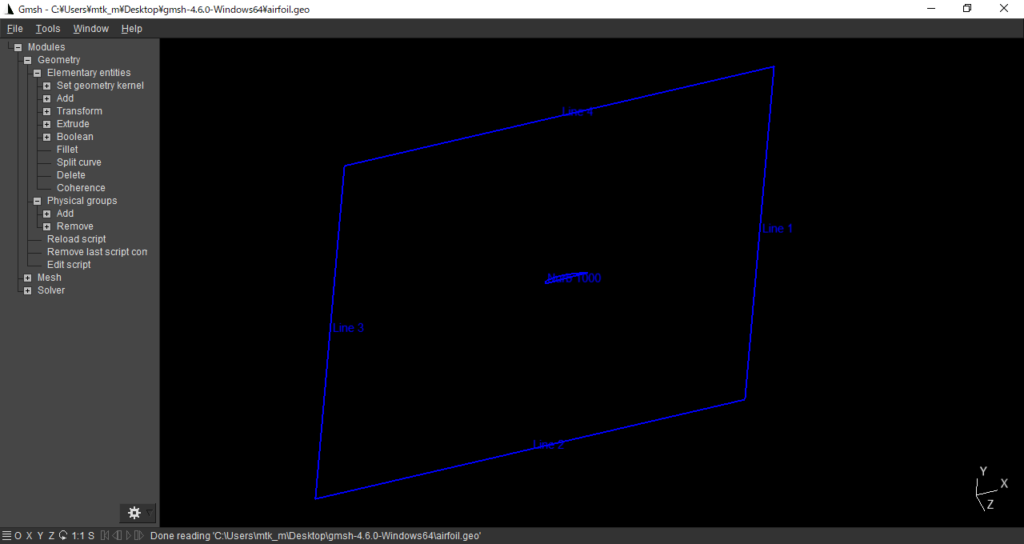
Line LoopコマンドとPlane Surfaceコマンドを使って,4つの直線と翼型から平面を作る
≫Gmsh reference manual (stable release) - 5.1.3 Surfaces
この平面は,正方形の平面から翼型の平面がくり抜かれたものになる
Line Loop (1) = {1,2,3,4};
Line Loop (2) = {1000};
Plane Surface(1) = {1,2};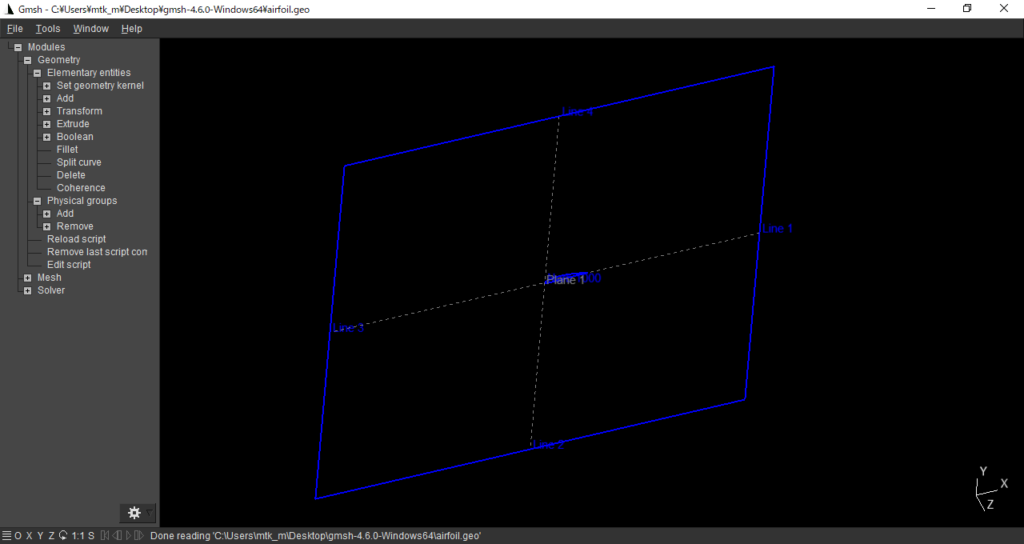
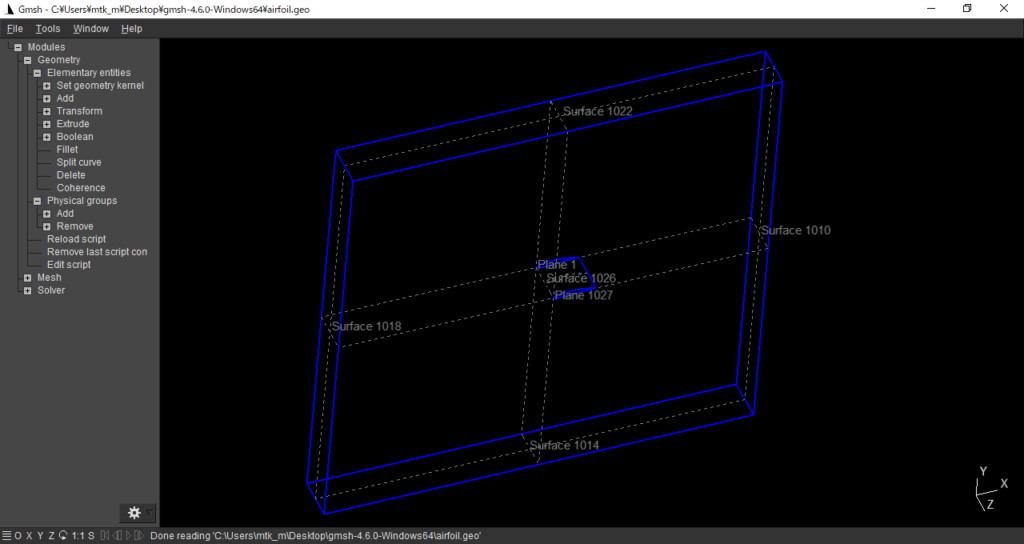
Extrudeコマンドを使って,平面を押し出す
≫Gmsh reference manual (stable release) - 6.3.2 Structured grids
Layersオプションは,押し出したレイヤーをいくつの要素に分割するかを指定する.今回行うのは2次元解析なので,ここでは1を指定しておく
Recombineオプションは,押し出しの際に新たに作られるメッシュを可能な限り三角形→四角形,四面体→プリズムorピラミッドに変換するよう指定する
Extrude {0, 0, 1} {
  Surface{1};
  Layers{1};
  Recombine;
}
最後に,Extrudeで新たに作られた平面の番号を参考にしながら,平面をphysical groupに追加していく
Physical Surface("back") = {1027};
Physical Surface("front") = {1};
Physical Surface("top") = {1022};
Physical Surface("exit") = {1010};
Physical Surface("bottom") = {1014};
Physical Surface("inlet") = {1018};
Physical Surface("aerofoil") = {1026};
Physical Volume("internal") = {1};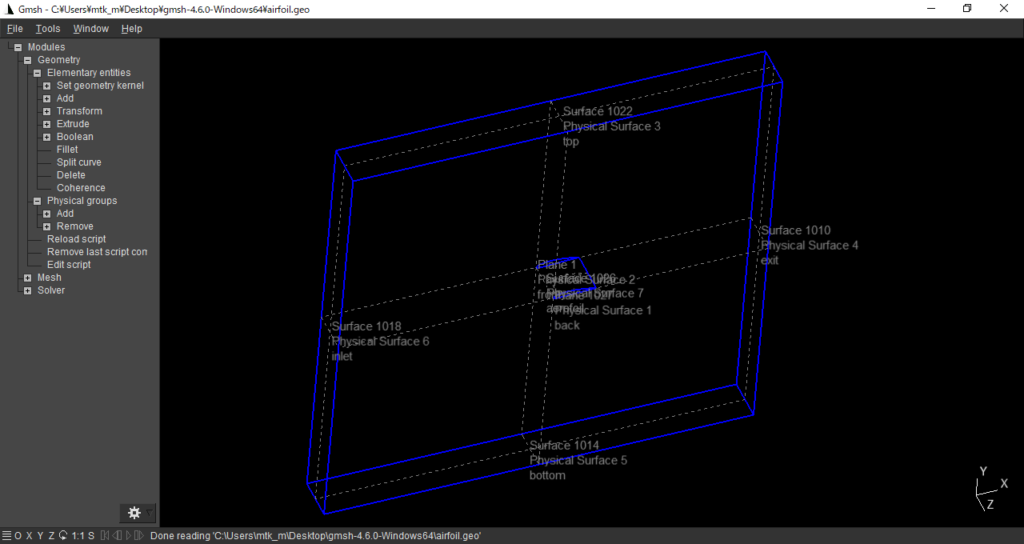
これでairfoil.geoファイルは完成である
airfoil.mshファイルの作成
airfoil.geoファイルが完成したので,airfoil.mshファイルを作成する
Ubuntuではコマンドで操作を行う
≫Gmsh reference manual (stable release) - 3.3 Command-line options
次のコマンドを実行すればいい
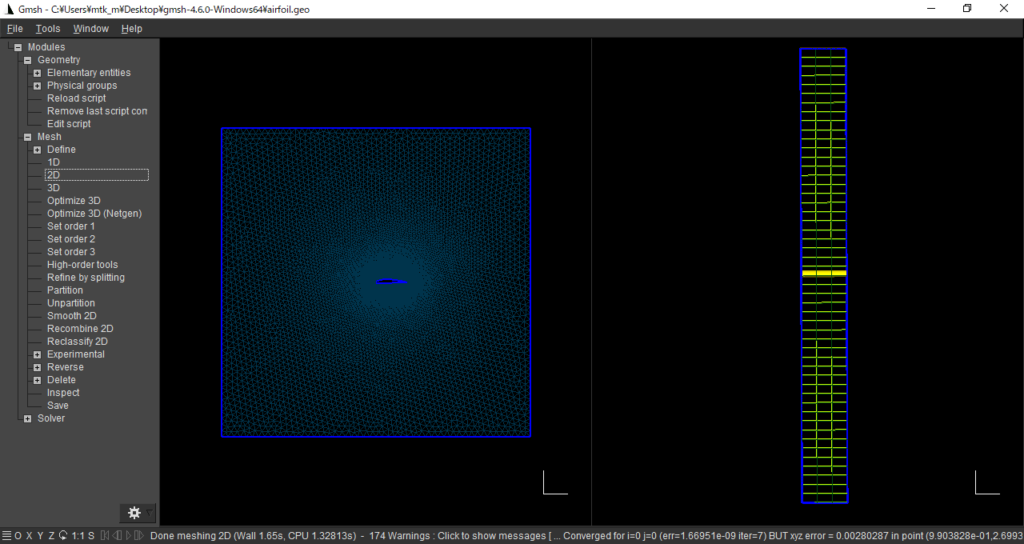
gmsh airfoil.geo -3 -o airfoil.mshすると,次のようなメッシュが完成する
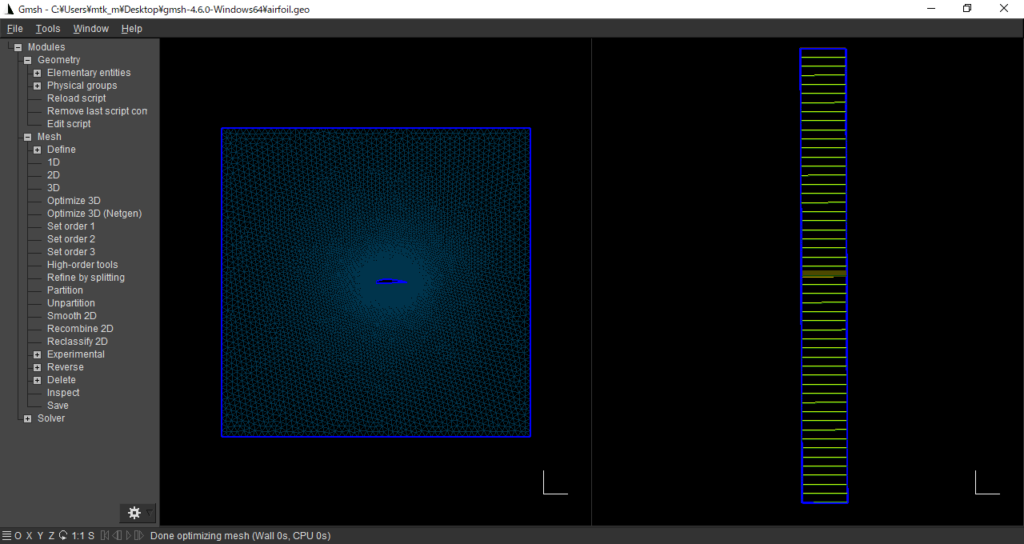
これでairfoil.mshファイルは完成である
ちなみに,ExtrudeコマンドのLayersオプションで3を指定すると,次のようなメッシュができる
押し出し方向に3つの要素が作られているのがわかる
gmshToFoam
gmshで作られたメッシュをOpenFOAMの形式に変換するには,gmshToFoamというコマンドを使う
≫OpenFOAM用メッシュをGmshで作成し変換する方法(gmshToFoam) - Qiita
このコマンドを実行すれば,gmshのメッシュがOpenFOAMの形式に変換され,constant/polyMesh/に保存される
gmshToFoam airfoil.mshconstant/polyMesh/boundary
最後に,いくつかのメッシュ境界を設定する
≫OpenFOAM User Guide - 4.2 Boundaries
メッシュ境界を設定するファイルはconstant/polyMesh/にあるboundaryというファイルである
このファイルを次のように変更する
- front, bask { type patch→empty; }
- aerofoil { type patch→wall; }
/*--------------------------------*- C++ -*----------------------------------*\
| =========                 |                                                 |
| \\      /  F ield         | OpenFOAM: The Open Source CFD Toolbox           |
|  \\    /   O peration     | Version:  v2006                                 |
|   \\  /    A nd           | Website:  www.openfoam.com                      |
|    \\/     M anipulation  |                                                 |
\*---------------------------------------------------------------------------*/
FoamFile
{
    version     2.0;
    format      binary;
    class       polyBoundaryMesh;
    arch        "LSB;label=32;scalar=64";
    location    "constant/polyMesh";
    object      boundary;
}
// * * * * * * * * * * * * * * * * * * * * * * * * * * * * * * * * * * * * * //

7
(
    front
    {
        type            empty;
        physicalType    patch;
        nFaces          28898;
        startFace       43042;
    }
    exit
    {
        type            patch;
        physicalType    patch;
        nFaces          50;
        startFace       71940;
    }
    bottom
    {
        type            patch;
        physicalType    patch;
        nFaces          50;
        startFace       71990;
    }
    inlet
    {
        type            patch;
        physicalType    patch;
        nFaces          50;
        startFace       72040;
    }
    top
    {
        type            patch;
        physicalType    patch;
        nFaces          50;
        startFace       72090;
    }
    aerofoil
    {
        type            wall;
        physicalType    patch;
        nFaces          410;
        startFace       72140;
    }
    back
    {
        type            empty;
        physicalType    patch;
        nFaces          28898;
        startFace       72550;
    }
)

// ************************************************************************* //
patchが基本的なメッシュ境界で,wallが壁面に使われる境界,emptyは今回のように3次元解析を2次元解析のように扱いたい時に使う境界である
条件設定
メッシュの準備ができたので,OpenFOAMの設定を行っていく
transportProperties
constant/transportPropertiesで物性値を入力する
ここでは,以下のように設定している
- 物性の種類:ニュートン流体
- 空気密度:\(\rho=1\) [kg/㎥]
- 動粘性係数:\(\nu=1\times 10^{-5}\) [㎡/s]
メッシュ作成に使用した翼型データのコード長は1.0 [m]なので,Re数を変えるときは一様流速V [m/s]を変えることになる
今回は定常計算なのでクーラン数は気にしない(でいいはず?)
≫クーラン数 _ 熱流体解析 _ ソフトウェアクレイドル
/*--------------------------------*- C++ -*----------------------------------*\
| =========                 |                                                 |
| \\      /  F ield         | OpenFOAM: The Open Source CFD Toolbox           |
|  \\    /   O peration     | Version:  5                                     |
|   \\  /    A nd           | Web:      www.OpenFOAM.org                      |
|    \\/     M anipulation  |                                                 |
\*---------------------------------------------------------------------------*/
FoamFile
{
    version     2.0;
    format      ascii;
    class       dictionary;
    location    "constant";
    object      transportProperties;
}
// * * * * * * * * * * * * * * * * * * * * * * * * * * * * * * * * * * * * * //

transportModel  Newtonian;

rho             [1 -3 0 0 0 0 0] 1;

nu              [0 2 -1 0 0 0 0] 1e-05;

// ************************************************************************* //
turbulenceProperties
constant/turbulencePropertiesで乱流モデルを選択する
≫PENGUINITIS - 乱流モデルの設定.html
≫OpenFOAM User Guide - 5.3 Turbulence models
ここでは,Spalart-Allmaras 1-eqn mixing-length modelを選択している
/*--------------------------------*- C++ -*----------------------------------*\
| =========                 |                                                 |
| \\      /  F ield         | OpenFOAM: The Open Source CFD Toolbox           |
|  \\    /   O peration     | Version:  5                                     |
|   \\  /    A nd           | Web:      www.OpenFOAM.org                      |
|    \\/     M anipulation  |                                                 |
\*---------------------------------------------------------------------------*/
FoamFile
{
    version     2.0;
    format      ascii;
    class       dictionary;
    location    "constant";
    object      turbulenceProperties;
}
// * * * * * * * * * * * * * * * * * * * * * * * * * * * * * * * * * * * * * //

simulationType RAS;

RAS
{
    RASModel        SpalartAllmaras;

    turbulence      on;

    printCoeffs     on;
}

// ************************************************************************* //
0
初期条件を設定する
0/Uについては,一様流速のx方向成分とy方向成分を設定する
/*--------------------------------*- C++ -*----------------------------------*\
| =========                 |                                                 |
| \\      /  F ield         | OpenFOAM: The Open Source CFD Toolbox           |
|  \\    /   O peration     | Version:  5                                     |
|   \\  /    A nd           | Web:      www.OpenFOAM.org                      |
|    \\/     M anipulation  |                                                 |
\*---------------------------------------------------------------------------*/
FoamFile
{
    version     2.0;
    format      ascii;
    class       volVectorField;
    object      U;
}
// * * * * * * * * * * * * * * * * * * * * * * * * * * * * * * * * * * * * * //

dimensions      [0 1 -1 0 0 0 0];

internalField   uniform (9.95184726672197 0.980171403295606 0);

boundaryField
{
    inlet
    {
        type            freestream;
        freestreamValue uniform (9.95184726672197 0.980171403295606 0);
    }

    exit
    {
        type            freestream;
        freestreamValue uniform (9.95184726672197 0.980171403295606 0);
    }

    top
    {
        type            freestream;
        freestreamValue uniform (9.95184726672197 0.980171403295606 0);
    }

    bottom
    {
        type            freestream;
        freestreamValue uniform (9.95184726672197 0.980171403295606 0);
    }

    aerofoil
    {
        type            fixedValue;
	    value		uniform (0 0 0);
    }

    front
    {
        type            empty;
    }

    back
    {
        type            empty;
    }
}

// ************************************************************************* //
0/pでは,圧力の初期条件として0を入力しておく
ここで圧力の単位が[m^2/s^2]であることが気になったが,非圧縮性流体では\(\rho=const.\)なのでkg=m^3と置き換えて,圧力の単位を[Pa]=[kg/m s^2]→[m^2/s^2]とするらしい
/*--------------------------------*- C++ -*----------------------------------*\
| =========                 |                                                 |
| \\      /  F ield         | OpenFOAM: The Open Source CFD Toolbox           |
|  \\    /   O peration     | Version:  5                                     |
|   \\  /    A nd           | Web:      www.OpenFOAM.org                      |
|    \\/     M anipulation  |                                                 |
\*---------------------------------------------------------------------------*/
FoamFile
{
    version     2.0;
    format      ascii;
    class       volScalarField;
    object      p;
}
// * * * * * * * * * * * * * * * * * * * * * * * * * * * * * * * * * * * * * //

dimensions      [0 2 -2 0 0 0 0];

internalField   uniform 0;

boundaryField
{
    inlet
    {
        type            freestreamPressure;
        freestreamValue uniform 0;
    }

    exit
    {
        type            freestreamPressure;
        freestreamValue uniform 0;
    }

    top
    {
        type            freestreamPressure;
        freestreamValue uniform 0;
    }

    bottom
    {
        type            freestreamPressure;
        freestreamValue uniform 0;
    }

    aerofoil
    {
        type            zeroGradient;
    }

    front
    {
        type            empty;
    }

    back
    {
        type            empty;
    }
}

// ************************************************************************* //
0/nutと0/nuTildaは特にいじっていない
/*--------------------------------*- C++ -*----------------------------------*\
| =========                 |                                                 |
| \\      /  F ield         | OpenFOAM: The Open Source CFD Toolbox           |
|  \\    /   O peration     | Version:  5                                     |
|   \\  /    A nd           | Web:      www.OpenFOAM.org                      |
|    \\/     M anipulation  |                                                 |
\*---------------------------------------------------------------------------*/
FoamFile
{
    version     2.0;
    format      ascii;
    class       volScalarField;
    object      nut;
}
// * * * * * * * * * * * * * * * * * * * * * * * * * * * * * * * * * * * * * //

dimensions      [0 2 -1 0 0 0 0];

internalField   uniform 0.14;

boundaryField
{
    inlet
    {
        type            freestream;
        freestreamValue uniform 0.14;
    }

    exit
    {
        type            freestream;
        freestreamValue uniform 0.14;
    }

    top
    {
        type            freestream;
        freestreamValue uniform 0.14;
    }

    bottom
    {
        type            freestream;
        freestreamValue uniform 0.14;
    }

    aerofoil
    {
        type            nutUSpaldingWallFunction;
        value           uniform 0;
    }

    front
    {
        type            empty;
    }

    back
    {
        type            empty;
    }
}

// ************************************************************************* //
/*--------------------------------*- C++ -*----------------------------------*\
| ========= | |
| \\ / F ield | OpenFOAM: The Open Source CFD Toolbox |
| \\ / O peration | Version: 5 |
| \\ / A nd | Web: www.OpenFOAM.org |
| \\/ M anipulation | |
\*---------------------------------------------------------------------------*/
FoamFile
{
version 2.0;
format ascii;
class volScalarField;
object nuTilda;
}
// * * * * * * * * * * * * * * * * * * * * * * * * * * * * * * * * * * * * * //
dimensions [0 2 -1 0 0 0 0];
internalField uniform 0.14;
boundaryField
{
inlet
{
type freestream;
freestreamValue uniform 0.14;
}
exit
{
type freestream;
freestreamValue uniform 0.14;
}
top
{
type freestream;
freestreamValue uniform 0.14;
}
bottom
{
type freestream;
freestreamValue uniform 0.14;
}
aerofoil
{
type fixedValue;
value uniform 0;
}
front
{
type empty;
}
back
{
type empty;
}
}
// ************************************************************************* //controlDict
system/controlDictで計算条件を設定する
残差を見るためにfunctions{ }に#includeFunc residualsを加えておいた
/*--------------------------------*- C++ -*----------------------------------*\
| =========                 |                                                 |
| \\      /  F ield         | OpenFOAM: The Open Source CFD Toolbox           |
|  \\    /   O peration     | Version:  5                                     |
|   \\  /    A nd           | Web:      www.OpenFOAM.org                      |
|    \\/     M anipulation  |                                                 |
\*---------------------------------------------------------------------------*/
FoamFile
{
    version     2.0;
    format      ascii;
    class       dictionary;
    location    "system";
    object      controlDict;
}
// * * * * * * * * * * * * * * * * * * * * * * * * * * * * * * * * * * * * * //

application     simpleFoam;

startFrom       startTime;

startTime       0;

stopAt          endTime;

endTime         500;

deltaT          1;

writeControl    timeStep;

writeInterval   500;

purgeWrite      0;

writeFormat     binary;

writePrecision  6;

writeCompression off;

timeFormat      general;

timePrecision   6;

runTimeModifiable true;

functions
{
	#includeFunc residuals
}


// ************************************************************************* //
residuals
system/residualsをサンプルファイルからコピーしてくる
cp /opt/OpenFOAM/OpenFOAM-v2006/etc/caseDicts/postProcessing/numerical/residuals ./systempとUの残差を出力する
/*--------------------------------*- C++ -*----------------------------------*\
  =========                 |
  \\      /  F ield         | OpenFOAM: The Open Source CFD Toolbox
   \\    /   O peration     | Version:  v1912
    \\  /    A nd           | Website:  www.openfoam.com
     \\/     M anipulation  |
-------------------------------------------------------------------------------
Description
    For specified fields, writes out the initial residuals for the first
    solution of each time step; for non-scalar fields (e.g. vectors), writes
    the largest of the residuals for each component (e.g. x, y, z).

\*---------------------------------------------------------------------------*/

#includeEtc "caseDicts/postProcessing/numerical/residuals.cfg"

fields (p U);

// ************************************************************************* //
計算実行
Allrunでソルバーを実行できる
./AllrunAllrunの中身はいたってシンプル
$WM_PROJECT_DIR/bin/tools/RunFunctionsでrunApplicationとかgetApplicationとかが定義されているらしい
#!/bin/sh
cd ${0%/*} || exit 1    # Run from this directory

# Source tutorial run functions
. $WM_PROJECT_DIR/bin/tools/RunFunctions

application=`getApplication`

runApplication $application

#------------------------------------------------------------------------------
残差の確認
foamMonitorを使って残差を確認してみる
ちなみに,前もってUbuntuにGnuplotとx11,WindowsにXmingをインストールしている
foamMonitor -l postProcessing/residuals/0/solverInfo.datするとこんなエラーが出た
/usr/bin/gnuplot: error while loading shared libraries: libQt5Core.so.5: cannot open shared object file: No such file or directory調べてみるとこんな記事が出てきた
≫WSLのArchLinuxでgnuplotが使えない - Qiita
結局このコマンドを打つと解決した
sudo strip --remove-section=.note.ABI-tag /usr/lib/x86_64-linux-gnu/libQt5Core.so.5というわけで気を取り直して再びfoamMonitorを実行すると,きちんと残差の履歴がプロットされた
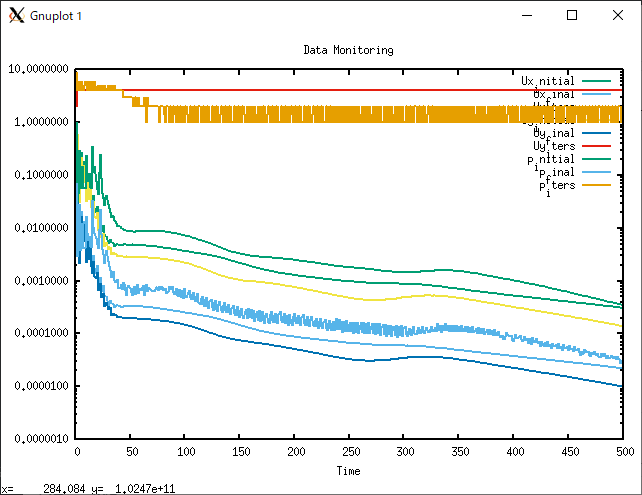
残差が収束していることが確認できる
ポスト処理
次のコマンドを実行してfoamファイルを作成する
touch airfoil.foamParaViewを開いて,結果を可視化する
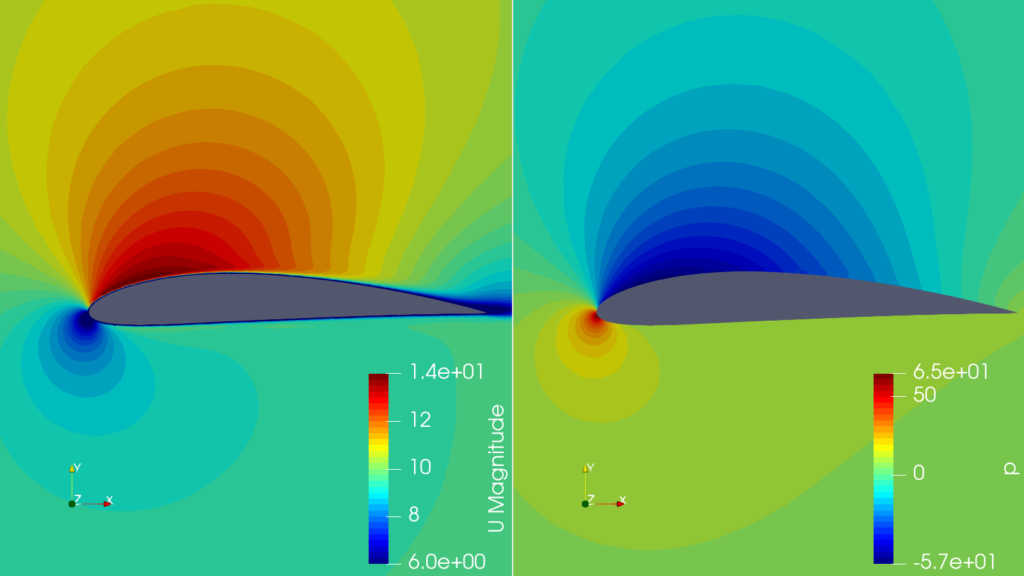
良さそうである
以上でOpenFOAMによる二次元翼型の解析は終了である
Allrun.py
これまでOpenFOAMで二次元翼型の解析を行う方法を紹介したが,翼型や解析条件(速度や迎角)が変わるたびにたくさんのファイルを手書きで書き直すのは非常に面倒であり,ミスも増える
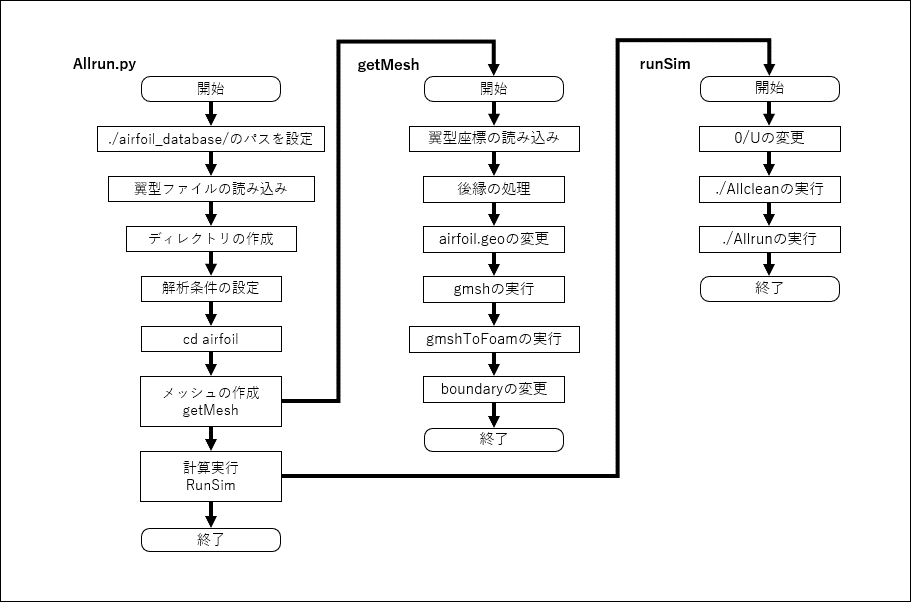
というわけで,それを全部やってくれるのがAllrun.pyである
ソースコードとフローチャート
ソースコードとフローチャートはこんな感じ
import os,math
import numpy as np

airfoil_database  = "./airfoil_database/"
output_dir        = "./train/"

files = os.listdir(airfoil_database)
if len(files)==0:
	print("error - no airfoils found in %s" % airfoil_database)
	exit(1)

makeDirs( ["./airfoil/constant/polyMesh/sets", "./airfoil/constant/polyMesh"] )

def makeDirs(directoryList):
    for directory in directoryList:
        if not os.path.exists(directory):
            os.makedirs(directory)

def genMesh(airfoilFile):
    ar = np.loadtxt(airfoilFile, skiprows=1)

    # removing duplicate end point
    if np.max(np.abs(ar[0] - ar[(ar.shape[0]-1)]))<1e-6:
        ar = ar[:-1]

    output = ""
    pointIndex = 1000
    for n in range(ar.shape[0]):
        output += "Point({}) = {{ {}, {}, 0.00000000, 0.005}};\n".format(pointIndex, ar[n][0], ar[n][1])
        pointIndex += 1

    with open("airfoil_template.geo", "rt") as inFile:
        with open("airfoil.geo", "wt") as outFile:
            for line in inFile:
                line = line.replace("POINTS", "{}".format(output))
                line = line.replace("LAST_POINT_INDEX", "{}".format(pointIndex-1))
                outFile.write(line)

    if os.system("gmsh airfoil.geo -3 -o airfoil.msh > /dev/null") != 0:
        print("error during mesh creation!")
        return(-1)

    if os.system("gmshToFoam airfoil.msh > /dev/null") != 0:
        print("error during conversion to OpenFoam mesh!")
        return(-1)

    with open("constant/polyMesh/boundary", "rt") as inFile:
        with open("constant/polyMesh/boundaryTemp", "wt") as outFile:
            inBlock = False
            inAerofoil = False
            for line in inFile:
                if "front" in line or "back" in line:
                    inBlock = True
                elif "aerofoil" in line:
                    inAerofoil = True
                if inBlock and "type" in line:
                    line = line.replace("patch", "empty")
                    inBlock = False
                if inAerofoil and "type" in line:
                    line = line.replace("patch", "wall")
                    inAerofoil = False
                outFile.write(line)
    os.rename("constant/polyMesh/boundaryTemp","constant/polyMesh/boundary")

    return(0)

def runSim(freestreamX, freestreamY):
    with open("U_template", "rt") as inFile:
        with open("0/U", "wt") as outFile:
            for line in inFile:
                line = line.replace("VEL_X", "{}".format(freestreamX))
                line = line.replace("VEL_Y", "{}".format(freestreamY))
                outFile.write(line)

    os.system("./Allclean && ./Allrun")

# main
fileNumber = 0

length = 10. #V [m/s], V=10. -> Re=10e6
angle  = -math.pi/32. #AOA [rad]
fsX =  math.cos(angle) * length
fsY = -math.sin(angle) * length

print("\tUsing len %5.3f angle %+5.3f " %( length,angle )  )
print("\tResulting freestream vel x,y: {},{}".format(fsX,fsY))

os.chdir("./airfoil/")
if genMesh("../" + airfoil_database + files[fileNumber]) != 0:
    print("\tmesh generation failed, aborting")

runSim(fsX, fsY)
os.chdir("..")

print("\tdone")
計算実行
/2D_airfoilでAllrun.pyを実行する
/2D_airfoil$ python Allrun.py
        Using len 10.000 angle -0.098
        Resulting freestream vel x,y: 9.95184726672197,0.980171403295606
Running simpleFoam on /mnt/c/Users/mtk_m/OneDrive/Documents/OpenFOAM/2D_airfoil/airfoil
        done
/2D_airfoil$
問題なく実行できる
まとめ
OpenFOAMを使って二次元翼の解析を行った
正直OpenFOAMのファイルをいじるよりもgmshのインストールの方が断然しんどかった
次は揚力係数や抗力係数を求めてみようと思う
↓関連記事


コメント